-
February 18th, 2011, 17:49
#1
عضو انجمن

 کمک برایی تنظیم dns در webmin
سلام
من webmin نصب کردم ، تو اینترنت سرچ هم کردم دیدم تنظیم dns از طریق BIND انجام می شه
اونم نصب کردم - ولی تو تنظیماتش مشکل دارم
با توجه به اینکه طول میکشه dns کش بشه - نمی تونم با آزمون و خطا نتیجه بگیرم
یه آدرس سرور موقع درخواست vps زدم server.domain.com
این چه ارتباطی با name server ها داره؟
می شه یکی دقیقا راهنماییم کنه - یا برام تنظیم کنه
خیلی محبت می کنید - دیگه اعصابمو خرد کرده - 2-3 روزه سایت هام داون هستند
بازم ممنون
---------- Post added at 03:36 PM ---------- Previous post was at 02:32 PM ----------
ضمنا دستور nano /etc/resolv.conf
این نتیجرو میده
nameserver 4.2.2.1
nameserver 4.2.2.2
---------- Post added at 03:37 PM ---------- Previous post was at 03:36 PM ----------
من خیلی سرچ کردم توی فروم - این سوال قبلا مطرح شده - ولی کسی اون موقع هم جواب نداده
یعنی انقدر آسونه که کسی زحمت جواب دادنشو نمی ده؟
---------- Post added at 04:49 PM ---------- Previous post was at 03:37 PM ----------
خوب من سوالمو دقیق تر می پرسم
شاید کسی جواب داد
بعد از ساخت master record با آدرس سرور و یک آی پی و ساخت Address record با آدرس www
الان دامنه برای اجرا شدن مشکلی نداره؟
ns1 , ns2 رو باید بسازم؟ ( یعنی میشه 3 تا name server?)
برای اتصال دامنه دیگه به این نیم سرور ها باید چی کار کرد؟

9303320300
-
-
February 18th, 2011 17:49
# ADS
-
February 18th, 2011, 18:12
#2
مدیر کل

پاسخ : کمک برایی تنظیم dns در webmin
شما در کنترل پنل دامین خودتون هر چند تایی که خواستید میتونید NameServer اضافه کنید ولی استاتدارد این کار 2 تا هست
مثلا ns1.webhostingtalk.ir و ns2.webhostingtalk.ir این تنظیمات رو میکنید و هر NS رو براش یک ایپی ست میکنید در کنترل پنل دامینتون که همون ایپی سرور ی هست که میخواید روش نصب کنید .
کد:
ns1.webhostingtalk.ir  ------> 217.219.219.219
ns2.webhostingtalk.ir  ------> 217.219.218.219
البته برای استاندارد بیشتر باید ایپی ها 2 تا نیم سرور از 2 کلاس ایپی مجزا باشه
عموما NS1 رو همیشه Master میگند چون اولین Request ها به این ایپی فرستاده میشه در صورتی که این ایپی جوابگو نبود سراغ NS2 میره .
حالا شما باید نیم سرور سمت سرور و نیم سرور ها یکی باشه
برای هر دامنه شما باید یک zone تعریف کنید .
و برای هر zone میتونید رکورد اضافه کنید
بیشترین مصرف ها از Record A هست
مثلا میگین رکورد www بره روی ایپی 217.219.12.12
---------- Post added at 06:12 PM ---------- Previous post was at 06:12 PM ----------
Hello,
Welcome to Webune Support Forums.
If you purchased a dedicated server from Webune. You can install an Open Source Domain Name Control panel for free, its called webmin,
Webune Dedicated Servers are Reliable -
to add a domain name to you server this is the procedure:
1. login to your webmin panel:
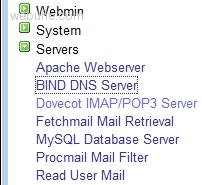
2. click on Servers then BIND DNS Serve
NOTE: if you get: The primary configuration file for BIND /var/named/chroot/etc/named.conf does not exist, or is not valid. Create it? - select 'Setup as an internet name server, and download root server information' and then go ahead a click the 'Create Primary Configuartion File and Start Nameserver' button. Once you have clicked on the button, you will see the icons.
3. under 'Existing DNS Zones' click on 'Create master zone.' and populate the following fields:
- Zone type [ Forward ]
- Domain name / Network [ Enter Domain Name you wan to add ]
- Records file [Automatic]
- Master server [you server's host name]
- Email address [admin's email address]
- Use zone template? [No]
- IP Address for template records // Provide the host's IP Address
- Add reverses for template addresses? [yes]
- Refresh time [Leave as is]
- Expiry time [Leave as is]
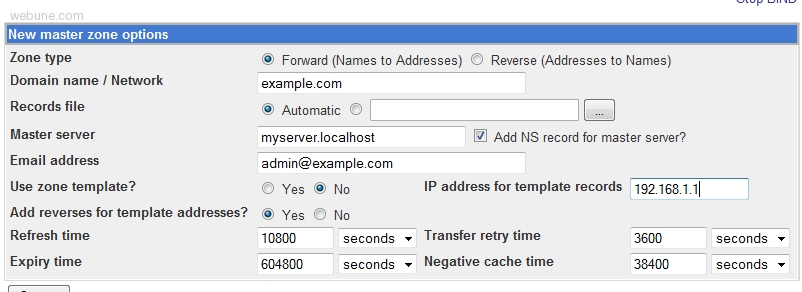
Click: [Create] Button after you have populated each field
4. When you click on 'Create' button, it will create your zone and it will direct you to 'Edit Master Zone' page. In the 'Edit Master Zone' page, click on the 'Address(0)' button:

5. in the 'Address Records' page, populate the following:
- Name [www]
- Address [Server's Ip Address]
- Time-To-Live [Default]
- Update reverse? [yes]

- Click 'Create'
after you created the address record, click on 'Return to record types' link at the bottom
- At the top menu you will a link that says 'Apply Configuration' click on it to apply the changes you have made.
6. Now that we have added your domain name to your DNS server, its time to create a virtual host in your Apache server so in the Servers category, click on 'Apache Webserver' link
7. When you are in the 'Apache Webserver' section, click on the 'Create Virtual Host' tab
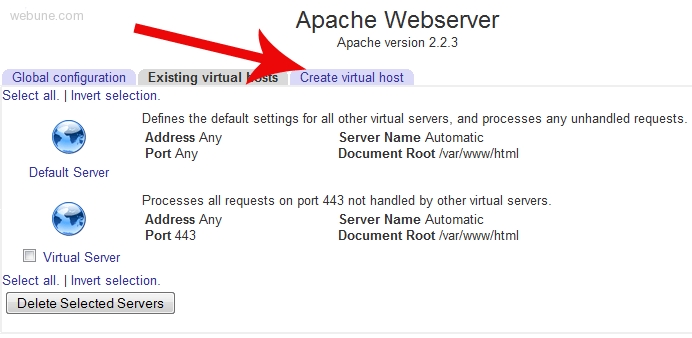
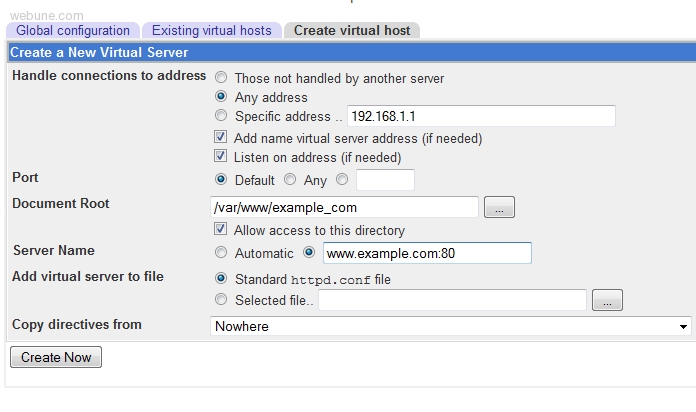
8. Populate the following fields:
- Handle connections to address [select: Specific Address... [enter the server's ip address]]
- Port [here you can select Default, Any or specify one. what i did, i specified port 80, so i entered 80]
- Document Root [here i specified which directory i was going to have this domain's files for this site. so i entered /var/www/html/mydomain but you can enter whatever directory you want to put your web files, its your choice]
- Server Name [i entered my domain name like this: www.mydomain.com:80 [i included the :80 part also]]
- Add virtual server to file [leave default as Standard httpd.conf file]
- Copy directives from [leave default: Nowhere]
9. After you have created the virtual host, you need to save the changes. there is a link "Apply Changes" click on it.
10. Thats it, now you can test it by accessing your new website: IANA — Example domains
برای پیش رفت در علم آسانسوری وجود ندارد پله ها را باید پیاده رفت /./ همیشه این یادتان باشد که دست بالای دست بسیار است.
يادمان باشد براي يك بار ايستادن صد ها بار افتاده ايم /./ بک آپ مهمترین رمز موفقیت هاستینگ /./ امنیت مطلق نیست.
ارتباط مستقیم با من :
Admin -{(@)}- WebHostingTalk . ir
-
تعداد تشکر ها ازVahid به دلیل پست مفید
-
February 18th, 2011, 18:39
#3
عضو انجمن
پاسخ : کمک برایی تنظیم dns در webmin
خیلی خیلی ممنونم بابت پاسختون
فقط دو تا سوال عمده دارم
1) قبل از این کارها لازم نیست Ns ها داخل وی پی اس تعریف بشن؟ فروشنده این کار رو کرده ؟ از کجا بفهمم؟
2) - Master server [you server's host name] این آدرس سرور هست؟ ( Server or ns)
3)host's IP Address با آی پی سرور فرق داره؟
9303320300
-


 پاسخ با نقل قول